Archlinux enabling hibernation
It’s now time to look at how to enable hibernation to a swapfile when we close the lid of the laptop. As a non Linux expert, it took me some time and some failure to arrive at the expect comfiguration. I didn’t want to use any helper script and wanted to setup everything using systemd. I want to enable hibernation because I want to have the ability to restart where I left the system without consuming energy. It’s true that restarting the computer will be slower, however this is a compromise that I accept.
The detailed instructions from the ArchLinux can be found below.
- Arch linux - Power management
- Arch linux - Power management/suspend and hibernate
- Arch linux - Swap
- Arch Linux - Grub
Setting up Hibernate mode.
In this section I will cover how to setup your ArchLinux to use a file swap to hibernate. This require a few change in the way we are starting the kernel as well as some subtility with the creation of this file. So let start.
Creating a swap file
Create a new swapfile
Allocating the file is quite simple with the command fallocate, but before we can do that we need to have an idea about how much memory we need to allocate. The recommendation is 2/5 of the total RAM available on your machine. This is good to know, however how can I quantify that. Luckily for us they are a file /sys/power/image_size which containt the information we are looking for. You can read the content of the file using the command cat. The size required for my system is 840889812 bytes which equivalent at ~841MB. So the comment to run in my case is to create the file /swapfile of 841MB is:
sudo fallocate -l 841M /swapfile
Change the permission of the new swapfile
The swap file could be a big hole in for your security. The first think we have to do is to remove any access to non root users but keet r/w to root
sudo chmod 600 /swapfile
Format the swap file
Before been able to use it, we need to format it. Same as when when create the system we have to use the command mkswap
sudo mkswap /swapfile
Enable the swap file
Same as when we installed archlinux, we have to enable the new swap file in the system with the command swapon
sudo swapon /swapfile
Add new swap file entry into /etc/fstab
Edit the file /etc/fstab and add the following file. This discribe the information about how to mount the new swap file as a file system
/swapfile none swap defaults 0 0
The content of your file should look like
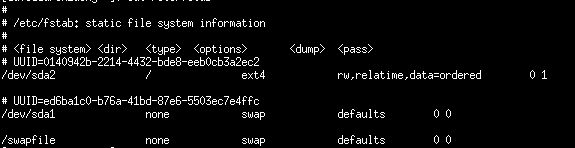
Great, We have a new swap partition which is just a simple file. We will use that to enable the hibernation to happen.
Update the kernel startup parameter using grub
We have to pass two news arguments to the startup kernel.
- resume : Give to the kernel the drive that contain the hibernate swap. This parameter is enough alone if you are not using a file swap
- resume_offset : Inform the kernel the offset for the start of the swap file on the partition.
As we are using grub as our bootloader we will update it’s configuration to start the kernel with this flag
Open /etc/default/grub
Add parameter resume
In the command line XXX of the file we need to add the parameter resume with the drive name that contain our swap file. In the case of my machine this file is located on the drive /dev/sda2. The parameter to is
resume=/dev/sda2
Add parameter resume_offset
Before adding this paramter we need to find the value we need for the offset. The simpliest solution using build in command is running the following command
sudo filefrag -v /swapfile
The result of the command should look like that
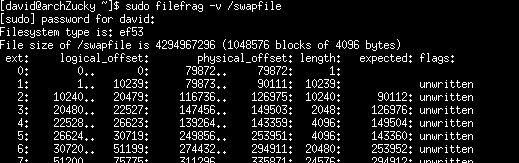
The value we want is from the first row the column physical_offset. In my case 79872. Now that we have this value we need to add this parameter to our startup kernel
resume_offset=79872
Generating the new grub.cfg configuration file
This can be simply done using the command line tool grub-mkconfig with the option of the location for the output file.
sudo grub-mkconfig -o /boot/grub/grub.cfg
Update mkinitcpio
‘mkinitcpio is a batsh script that create an initial ramdisk environment’. You can find more information mkinitcpio. We need to update the startup hook to add the resume one. This will ensure that the system can restore from the hibernation.
Add resume hook to /etc/mkinitcpio.conf
We have to edit in the file /etc/mkinitcpio.conf the section HOOK. This section control the module that are been loaded into the image at boot time. You need to add in the set of argument there the resume one.
For example my current section is looking like that.

Generate the images
The command we need to use to generate this boot image is mkinitcpio. The default setup is reading the information from the configuration file /etc/mkinitcpio.conf. As we want to generate the base image for in the default ArchLinux path we can use the option -p. The command we have to run on elevated mode is.
sudo mkinitcpio -p linux
Enable systemd handle
They are multiple solution to enable the handle abd choose the right behavior. You can find more information there . The solution I choose is the drive the handle action using the systemd as the base. The configuration of the handles can be find in the configuration file /etc/systemd/logind.conf. The handles we want to set are :
- HandleLidSwitch : Action when we close the lid of the laptop
- IdleAction : Action taken after the idle event is raised
- IdleActionSec : Time before the idle event is raised
What I want is the laptop to go on hibernate mode by default for the two event above. I’m more worried about battery than starting time (Which is not the slow anyway compare to Windows ). We just have to put for this event the value hibernate and we will be in the right state.
Next step and summary
I’m happy with where I finish, however I want to do the next step which is mixing suspend and hibernate, so I will do a quick hardware update and reinstall my machine after changing the hard drive to an SSD. With today cost of ~300 HKD (~40 USD), this will be a good one. The advantage of having an SSD will be that I won’t have to worried about the laptop waking up during transport to hibernate. I will have to restart my base install and check what specific setting I need for SSD.
So next step. How to change the hard drive of the EEEPC 1101HA to an SSD