ArchLinux - Using netctl to setup the network
For this article we will focus on network setup (at least what I’ve found so far) and will look at some of the useful commands that I now use often.
Setting up the network, and more specifically the wifi can be traumatic. However, even without X windows there are some nice simple tools to help you to setup the wifi connection (like ‘wifi-menu’ that we used earlier).
If you follow the step to set up the base installation from this article, you should already have from your base installation the packages netctl and dialog. netctl is a batch script built on top of systemctl that allows you to start or stop the network profile configuration service.
Connecting Manually
Before trying to connect using some auto detection, it would be good to understand what is happening under the hood. netctl is a simple command that allow you to list available profiles, start a profile or stop a profile. In this section we will first look at how to setup a wired connection followed by a wifi one, and then get a quick overview of the netctl command line tool.
Setting up an Ethernet profile
netctl stores the connection profile in the folder /etc/netctl. This folder has a child one named /etc/netctl/example which contain a set of different example profiles. We are interested here in the example profile whose name starts with ‘ethernet’. In my case I have 3 examples:
- ethernet-custom : allows you to see all the available fields you can set up
- ethernet-dhcp : example to connect and get the IP address from a DHCP server
- ethernet-static : example to setup a profile using a static IP address
As my router is doing as well DHCP server for me, I will simply set up the profile using ethernet-dhcp as a sample. The steps we have to do are:
Find the ethernet network interface name
Linux has a command line ip utility that allow you to query and update the network interfaces. The command line to run to list the network interfaces is
ip link
The result of the query is in my case

The ethernet adaptor name starts everytime with enp - in my case the name is enp3s0
Copy the example /etc/netctl/example/ethernet-dhcp to /etc/netctl
We need to copy the example file /etc/netctl/example/ethernet-dhcp to the folder /etc/netctl and give it a name that is meaningful. In my case I will name it enp3s0-ethernet-dhcp because it’s a good representation of the profile’s meaning. Back to the command shell to copy the file using :
cp /etc/netctl/example/ethernet-dhcp /etc/netctl/enp3s0-ethernet-dhcp
Edit the Profile
You can use any text editor that you want - vim is the one I’m using every time. We want to open /etc/netctl/enp3s0-ethernet-dhcp to change the property Interface with the one we found at step 1. The content you should have in the file at minimum is :

Check the permission
The profile we just updated is good, however this is not protected against being seen by unauthorised users. This profile doesn’t have a lot of important information, although it will do later on for the wifi setup. We will change the password using the command line chmod and set read/write only for the root users.
chmod 600 enp3s0-ethernet-dhcp
Plug in the ethernet cable and start the profile
We can now plug in our ethernet cable and start the profile. We will use the command line netctl. The command to start the profile is
sudo netctl start enp3s0-ethernet-dhcp
The best command to test that the profile is enabled and that you can access the network is to ping the google dhcp server with the address 8.8.8.8 :-)
Setting wifi profile
If you installed the package dialog in the first post about installing archlinix, this allows you to use a simple user interface that doesn’t require X windows to be installed. The command we will use is wifi-menu, which is a simple script built on top of netctl.
Please always use the command *wifi-menu* with the option *-o* to be sure that the password is hashed in the profile file.
Running the command wifi-menu will create the profile file in the folder /etc/netctl and connect you to the network at the same time. You can even run the command again to connect to the wifi anytime you want to change the connection. The command you have to run is the following
sudo wifi-menu -o
You will see the following displayed:
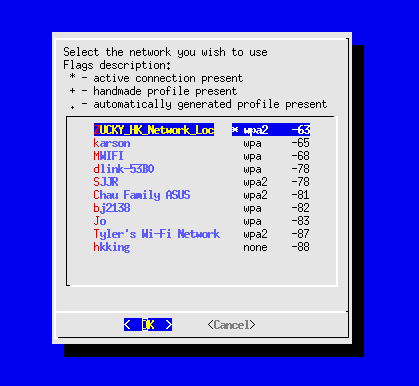
Creating a wifi profile is simple with the use of wifi-menu. However you can also create a wifi profile using the same type of manual steps as we used to set up the ethernet connection. The hardest part I found about doing that is that you need to know the wifi security type and you may have to put your password in clear.
Usage of netctl
Earlier we already use the command netctl to start the ethernet connectoin. netctl has a lot more option that I will list now.
- List and display active connection
- Stop/Start connection
- Enable/Disable auto start connection
Listing the profile available
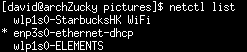
netctl is using the folder /etc/netctl to save the registered profile. What is good is that the tool has an option to list that directly and display as well the connections that are active with a *.
netctl list
The output of that command will look like that.
Starting and stoping profile
netctl allow to start and stop connection profile. This command require root permission and need to be run under sudo.
# start the connection
sudo netctl start wpl1s0-myconnection

# Stop the connection
sudo netctl stop wlp1s0-myconnection
Enable and disable auto connection as start
netctl can add a conneciton into systemctl which control the linux services. This is really usefull if you are connection everytime with the same profile, like ethernet or your home wifi. We will see later on how we could automate that even more so the system can detect and automatically switch profile for you.
#Enable the profile wlp1s0-myconnection to start at boot
sudo netctl enable wpl1s0-myconnection

#Disable the prfile wlp1s0-myconnection to start at boot
sudo netctl disable wpl1s0-myconnection
Automating auto connection
The information below come from the Archlinux Wiki on [netctl][https://wiki.archlinux.org/index.php/netctl#Automatic_switching_of_profiles]. The next step will require you to have a network connection active (ethernet or wifi) because we will need to install some new packages.
Ethernet
So far you can only connect using the command line netctl. This is great, however it would be even better if when you plug-in an ethernet cable your computer reconize it and get automatically an IP address. Luckilly they are a service that you can install that know how to read the netctl config file and which will automatically handle the connection. The package is named ifplugd.
- Install ifplugd
sudo pacman -S ifplugd
- Enable the service Please note that you need to replace enp3s0 with the identifier of your network interface.
sudo systemctl enable netctl-ifplugd@enp3s0.service
Wifi
I will provide you as well the way for the Wifi connection to automatically witch between your available profile and pick up the best one. Personally I don’t like my computer to do think for me and I don’t mind typing one command to connect, so I haven’t enabled this service. I feel as well it’s more secure that way. The service that allow auto connection of wifi profile is named wpa_actiond.
- Install wpa_actiond
sudo pacman -S wpa_actiond
- Enable the service Please note tht you need to replace teh wlp1s0 wuth the identifier of your wifi interface
sudo systemctl enable netctl-auto@wlp1s0.service
Summary
Great, now we have some network, which will allow us to install new package and application to setup the rest of the computer. One think we will foccus on next is the user interface. This will make the computer little more firendly :-). See you on the next post.